


News
iPhone X Teardown P2
Date: 01-22-2018 Click: 10316Step 14


The new dual-celled battery has four pull-tabs, similar to the shorter ones we found in the 8 series, albeit in an entirely new orientation.
The pull-tabs are adhered to the sides of the cells, rather than folded over the top, making the procedure a little trickier than usual.
This phone is packing a 10.35 Wh (2716 mAh at 3.81 V) battery, just beating out the 10.28 Wh 8 Plus battery, but a drop in the bucket compared to the Galaxy Note8 with its 12.71 Wh behemoth.
The dual-cell design is more of a space-utilization measure than a capacity-changing one. Two cells allows for more creative shapes and placement, to best take advantage of the space left over by shrinking the logic board.
Step 15

Hey remember that Face ID feature? In an unusual turn of events, we actually tested it before we tore the phone down. Turns out our IR-enabled video camera isn't fast enough to snag the dot pattern, but we can see the illumination alright!
History time: way back in the day, Microsoft made a nifty spatial sensor called the Kinect. The infrared dot matrix tech powering it was created by Israeli tech company PrimeSense.
Apple bought PrimeSense for a cool $360 million way back in 2013, and has surely invested hundreds of millions more since then bringing this to market.
Meanwhile, Microsoft was left in the lurch and had to scramble to develop a new sensing system for the Kinect 2. Perhaps now that the iPhone has a depth sensor, people will attach it to drones, too!
Step 16
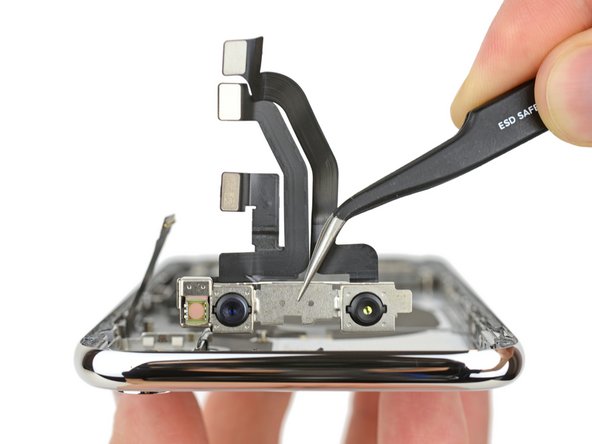


We turn our attention to the top of the phone to find the much anticipated mini Kinect TrueDepth camera system! This system rallies a team of sensors to bring facial recognition to the X.
Step one in this system: the flood illuminator embedded in the display blasts your face with infrared (IR) light.
Next, the front-facing camera, marked in red, confirms the presence of a face.
Then the IR dot projector, far right, projects a grid of dots over your face to create a three-dimensional map.
Finally, the IR camera on the left reads this map, and sends the data to the phone.
Under the hood, the X works some seriously fast software magic to bring all these pieces together and figure out if you're you, or your evil twin.
Step 17


The end is in sight, and we're powering through the remaining components in the rear case.
This first little bracket is covered in spring connectors and EMI grounding fingers, and has a ribbon cable stuck to the back.
Next out is the lower speaker enclosure, replete with ooey gooey waterproofing adhesive around the port.
And lastly, the Taptic Engine and famed barometric vent are freed. Apple's Taptic Engine continues to be a linear oscillator vibration motor.
Step 18

In fine form as always, our teardown engineer demonstrates dual tweezer technique to remove the Lightning connector.
Good news for anyone with the wiggly charging cable blues: the Lightning connector is looking extra-reinforced, with a wider bracket that screws into the sidewall of the frame.
It also features through holes for the exterior pentalobe screws to pass through and key into the display, as we saw earlier.
Step 19


With the main assembly picked to bits, we turn our attention back to the display. The first thing to pop out at us is the earpiece speaker, newly redesigned with a cool duct to channel sound out of the display.
Carefully extricating the upper display components yields the most complex upper display component collection we've seen yet. It's home to a loudspeaker, microphone, ambient light sensor, flood illuminator, and proximity sensor.
After picking off all the modular bits, we're left with a bare display.
Step 20


Time to get a look at that mystery chip! With a little help from our friends at TechInsights, we get a peek under the shields on the back of the display and find:
A Broadcom touch screen controller, labeled BCM15951B0KUB2G.
Also along for the ride: a new STMicro device we have not seen before, an OLED PMIC labeled 10 THADT733 X-139U.
Step 21


Getting down to the X's bare metal, we run into another familiar piece to this densely-packed puzzle: the wireless charging coil.
Oh, and everything attached to it, including the volume buttons, ring/silent switch, and an unidentified sensor bracket.
We also peel out the other crazy multi-function cable from the top of the phone. This assembly's home to the quad-LED True Tone flash and the power button, much like iPhones of yore.
Step 22
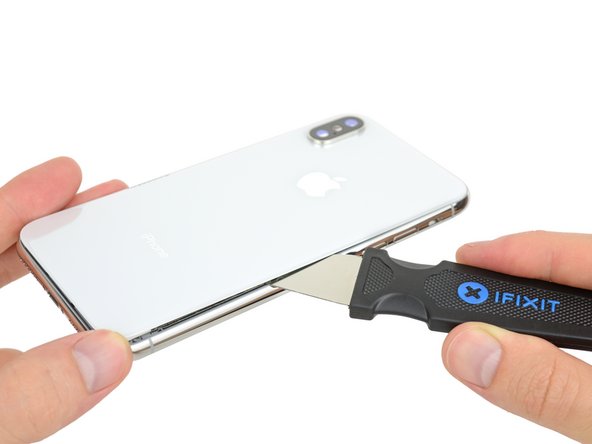


Bonus round: What happens when you break the rear glass on your brand new iPhone X?
After lots and lots of heat, we sheathed the spudger and drew our Jimmy. Like the iPhone 8 and 8 Plus, The X features a seriously glued rear panel.
After all of our careful Jimmying, we're still stuck: Unlike the iPhone 8's single piece rear panel, the camera bump overlaps the rear glass, and is meticulously welded to the metal frame beneath.
In this classic hand-stuck-in-cookie-jar situation, we can either cut off our hand (the camera bump) or shatter the cookie jar (the rear glass). Great.
We opt for the camera bump-ectomy for an intact glass panel. Those replacing a broken panel won't have any good options—and they'll have a heck of a time scraping out the shards of glued-down glass.
Step 23

We hope you enjoyed your 22-course teardown meal. We found it very nutritious.
In case you missed the iPhone 8 or iPhone 8 Plus teardowns, you can check those out for some comparisons. And feel free to check out our Smartphone Repairability list for past device scores as well.
Thanks once again to our handy helpers,Circuitwise, Creative Electron, and TechInsights!
Want to see the inside of your phone without opening it up? Check out our HD see-through and X-ray iPhone X wallpapers.
